Activation
All Unity actions require activation.
Choosing the Right Activation Method
To activate Unity, select the method that matches your license type:
- If you're using the free version, follow the steps for a Personal License.
- If you're using the paid version, such as Unity Plus or Pro, refer to the instructions for a Professional License.
- For organizations using a license server, you can provide the server's URL as detailed in the License Server section.
Choose the appropriate method to ensure your Unity environment is activated and ready for use.
Personal license
Follow these steps if you are using the free version of Unity.
Note: Do not follow the steps for the personal license if you have a professional license.
Mental Model
- Activate the license locally: Use Unity Hub to create a
.ulflicense file linked to your Unity account. - Add the license to GitHub: Store the
.ulffile and Unity credentials as GitHub secrets for use in CI builds.
Setting Up Your Unity License
Install Unity Hub: Download and install Unity Hub on your local machine.
Log in to Unity Hub: Use the Unity account linked to your CI setup to log in. Ensure you're using the correct account to activate the intended license.
Activate Your License: Manually activate by navigating to:
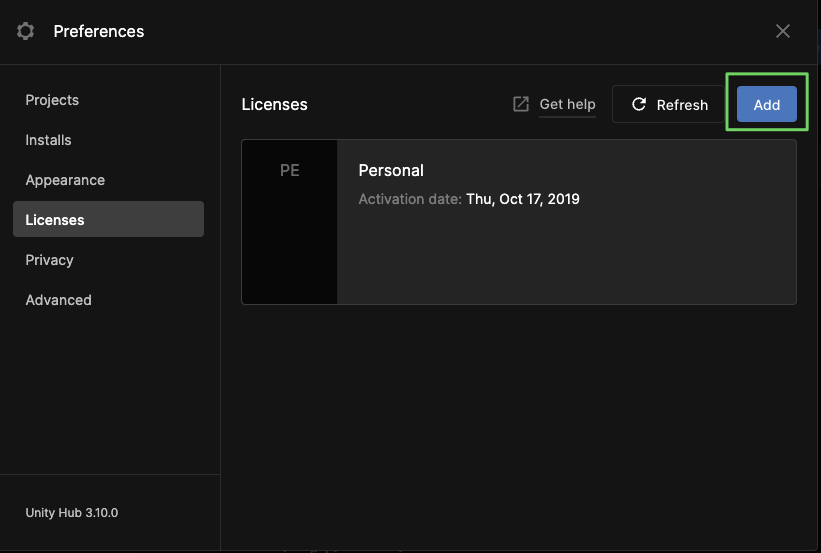
Unity Hub>Preferences>Licensesand click theAddbutton- Select Get a free personal license.
Ensure File CreationEven if a license appears in Unity Hub, a
.ulffile may not have been created. To ensure the file is generated, make sure to click theAddbutton and proceed with the activation steps. Do not skip this step.
Locate the
.ulffile: Depending on your operating system, the Unity license file will be located in one of these paths:- Windows:
C:\ProgramData\Unity\Unity_lic.ulf - Mac:
/Library/Application Support/Unity/Unity_lic.ulf - Linux:
~/.local/share/unity3d/Unity/Unity_lic.ulf
If you have trouble locating the
.ulffile, follow these steps:- Check activation: Ensure you’ve logged into Unity Hub and completed the step "3. Activate Your License".
- Reveal hidden files: These folders may be hidden by default, so enable the option to view hidden files in your file explorer.
- Use any platform: Licenses are not tied to a specific Unity version or platform. You can
activate the license on any operating system, such as Windows, and use it for builds on another
platform, like Ubuntu. Simply retrieve the
.ulffile from the platform most convenient for you.
- Windows:
Add Secrets to GitHub: Navigate to
GitHub><Your repository>>Settings>Secrets and Variables>Actions. Then, create the following secrets:UNITY_LICENSE: Copy and paste the contents of your.ulflicense fileUNITY_EMAIL: Enter the email address associated with your Unity accountUNITY_PASSWORD: Enter the password for your Unity account
GameCI does not acquire nor store your Unity email, password, or license file contents. They are required for activating the license during build and test steps.
Professional license
- Subscribe to Unity Plus or Unity Pro, and get your Serial Key from the Unity Subscriptions page
- Open
Github><Your repository>>Settings>Secrets - Create the following secrets;
UNITY_SERIAL- (Add the serial key from step 1 that looks likeXX-XXXX-XXXX-XXXX-XXXX-XXXX)UNITY_EMAIL- (Add the email address that you use to login to Unity)UNITY_PASSWORD- (Add the password that you use to login to Unity)
GameCI does not acquire nor store your Unity email, password, or serial number. They are required for activating the license during build and test steps.
Note: Do NOT follow the steps for the personal license if you have a professional license.
License Server
If you host your own Unity license server you can provide its url using unityLicensingServer. A
floating license will be acquired before the build, and returned after.
Example of use:
- uses: game-ci/unity-builder@v4
  with:
    targetPlatform: WebGL
    unityLicensingServer: [url to your license server]
Optional steps
- Verify your license using Activate.
- When using a pro license also use Return License to free up the license allocation after usage.
Note: Test runner and Builder already include these steps.
Next steps
The license can now be used in test and build steps.
You are now ready to start configuring these.